1.组合原生控件
将自己需要的控件组合起来变成一个新控件,如下制作常见的app页面头部.
新建一个Android项目,创建一个头部布局view_top.xml
- <?xml version="1.0" encoding="utf-8"?>
- <RelativeLayout xmlns:android="http://schemas.android.com/apk/res/android"
- android:layout_width="match_parent"
- android:layout_height="wrap_content"
- android:orientation="vertical"
- android:background="#50e7ab"
- android:padding="10dp">
-
- <ImageView
- android:id="@+id/top_left"
- android:layout_width="wrap_content"
- android:layout_height="wrap_content"
- android:src="@mipmap/fanhui_bai" />
-
- <TextView
- android:id="@+id/top_title"
- android:layout_width="wrap_content"
- android:layout_height="wrap_content"
- android:layout_centerHorizontal="true"RelativeLayout
- android:layout_centerVertical="true"
- android:text="首页"
- android:textSize="17sp"
- android:textColor="#ffffff" />
-
- <TextView
- android:id="@+id/top_right"
- android:layout_width="wrap_content"
- android:layout_height="wrap_content"
- android:text="提交"
- android:textSize="17sp"
- android:textColor="#ffffff"
- android:layout_centerVertical="true"
- android:layout_alignParentRight="true" />
- </RelativeLayout>
下面创建一个TopView继承RelativeLayout
- package t.s.com;
-
- import android.content.Context;
- import android.util.AttributeSet;
- import android.view.LayoutInflater;
- import android.widget.ImageView;
- import android.widget.RelativeLayout;
- import android.widget.TextView;
-
- /**
- * Created by Administrator on 2017/10/19.
- */
-
- public class TopView extends RelativeLayout {
- // 返回按钮控件
- private ImageView top_left;
- // 标题Tv
- private TextView top_title;
-
- private TextView top_right;
-
- public TopView(Context context) {
- super(context);
- }
-
- public TopView(Context context, AttributeSet attrs) {
- super(context, attrs);
- // 加载布局
- LayoutInflater.from(context).inflate(R.layout.view_top, this);
- // 获取控件
- top_left = (ImageView) findViewById(R.id.top_left);
- top_title = (TextView) findViewById(R.id.top_title);
- top_right = (TextView) findViewById(R.id.top_right);
- }
-
-
- // 为左侧返回按钮添加自定义点击事件
- public void setOnclickLeft(OnClickListener listener) {
- top_left.setOnClickListener(listener);
- }
-
- // 设置标题的方法
- public void setTitle(String title) {
- top_title.setText(title);
- }
-
- // 设置标题的方法
- public void setRightTitle(String title) {
- top_right.setText(title);
- }
-
- }
然后在activity_main.xml中引用
- <?xml version="1.0" encoding="utf-8"?>
- <LinearLayout xmlns:android="http://schemas.android.com/apk/res/android"
- xmlns:app="http://schemas.android.com/apk/res-auto"
- xmlns:tools="http://schemas.android.com/tools"
- android:layout_width="match_parent"
- android:layout_height="match_parent"
- tools:context="t.s.com.MainActivity">
- <t.s.com.TopView
- android:id="@+id/top_view"
- android:layout_width="match_parent"
- android:layout_height="wrap_content" />
- </LinearLayout>
然后再在MainActivity中对控件做操作
- package t.s.com;
-
- import android.support.v7.app.AppCompatActivity;
- import android.os.Bundle;
- import android.view.View;
- import android.widget.Toast;
-
- public class MainActivity extends AppCompatActivity {
- private TopView topView;
-
- @Override
- protected void onCreate(Bundle savedInstanceState) {
- super.onCreate(savedInstanceState);
- setContentView(R.layout.activity_main);
- topView = (TopView) findViewById(R.id.top_view);
-
- topView.setOnclickLeft(new View.OnClickListener() {
- @Override
- public void onClick(View view) {
- Toast.makeText(MainActivity.this, "点击了返回按钮", Toast.LENGTH_SHORT).show();
- }
- });
- topView.setRightTitle("设置");
- topView.setTitle("首页");
- }
- }
2.自己绘制控件
熟悉view的绘制原理
1.measure用来测量View的宽和高。
2.layout用来确定View在父容器中放置的位置。
3.draw用来将view绘制在屏幕上
2.layout用来确定View在父容器中放置的位置。
3.draw用来将view绘制在屏幕上
创建一个类CustomView继承View,实现点击事件接口OnClickListener
- package t.s.com;
-
- import android.content.Context;
- import android.graphics.Canvas;
- import android.graphics.Color;
- import android.graphics.Paint;
- import android.graphics.Rect;
- import android.util.AttributeSet;
- import android.view.View;
-
- /**
- * Created by Administrator on 2017/10/19.
- */
-
- public class CustomView extends View implements View.OnClickListener {
-
- // 定义画笔
- private Paint mPaint;
- // 用于获取文字的宽和高
- private Rect mRect;
- // 计数值,每点击一次本控件,其值增加1
- private int mCount=0;
-
- public CustomView(Context context, AttributeSet attrs) {
- super(context, attrs);
-
- // 初始化画笔、Rect
- mPaint = new Paint(Paint.ANTI_ALIAS_FLAG);
- mRect = new Rect();
- // 本控件的点击事件
- setOnClickListener(this);
- }
-
- @Override
- protected void onDraw(Canvas canvas) {
- super.onDraw(canvas);
- mPaint.setColor(Color.BLACK);
- // 绘制一个填充色为蓝色的矩形
- canvas.drawRect(0, 0, getWidth(), getHeight(), mPaint);
- mPaint.setColor(Color.WHITE);
- mPaint.setTextSize(50);
- String text = String.valueOf(mCount);
- // 获取文字的宽和高
- mPaint.getTextBounds(text, 0, text.length(), mRect);
- float textWidth = mRect.width();
- float textHeight = mRect.height();
-
- // 绘制字符串
- canvas.drawText("点了我"+text+"次", getWidth() / 2 - textWidth / 2, getHeight() / 2
- + textHeight / 2, mPaint);
- }
-
- @Override
- public void onClick(View view) {
- mCount++;
- invalidate();
- }
- }
在activity_main.xml中引入该自定义布局:
- <?xml version="1.0" encoding="utf-8"?>
- <LinearLayout xmlns:android="http://schemas.android.com/apk/res/android"
- xmlns:app="http://schemas.android.com/apk/res-auto"
- xmlns:tools="http://schemas.android.com/tools"
- android:layout_width="match_parent"
- android:layout_height="match_parent"
- android:orientation="vertical"
- tools:context="t.s.com.MainActivity">
-
- <t.s.com.TopView
- android:id="@+id/top_view"
- android:layout_width="match_parent"
- android:layout_height="wrap_content" />
-
-
- <t.s.com.CustomView
- android:id="@+id/custom"
- android:layout_width="300dp"
- android:layout_height="200dp"
- android:layout_gravity="center"/>
-
-
- </LinearLayout>
运行效果图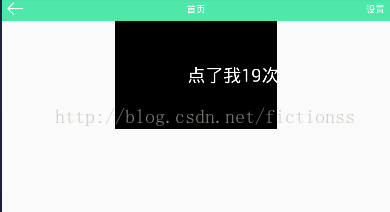
当然这个自定义控件比较粗糙,实际的要根据业务需求逻辑自己绘制,原理一样.
3.继承原生控件 下面以一个不允许输入表情的EditText作为例子
- package t.s.com;
- import android.annotation.SuppressLint;
- import android.content.Context;
- import android.text.Editable;
- import android.text.Selection;
- import android.text.Spannable;
- import android.text.TextWatcher;
- import android.util.AttributeSet;
- import android.widget.EditText;
- import android.widget.Toast;
-
- /**
- * Created by Administrator on 2017/6/5 0005.
- */
-
- @SuppressLint("AppCompatCustomView")
- public class EmoEditText extends EditText {
- //输入表情前的光标位置
- private int cursorPos;
- //输入表情前EditText中的文本
- private String inputAfterText;
- //是否重置了EditText的内容
- private boolean resetText;
-
- private Context mContext;
-
- public EmoEditText(Context context) {
- super(context);
- this.mContext = context;
- initEditText();
- }
-
- public EmoEditText(Context context, AttributeSet attrs) {
- super(context, attrs);
- this.mContext = context;
- initEditText();
- }
-
- public EmoEditText(Context context, AttributeSet attrs, int defStyleAttr) {
- super(context, attrs, defStyleAttr);
- this.mContext = context;
- initEditText();
- }
-
- // 初始化edittext 控件
- private void initEditText() {
- addTextChangedListener(new TextWatcher() {
- @Override
- public void beforeTextChanged(CharSequence s, int start, int before, int count) {
- if (!resetText) {
- cursorPos = getSelectionEnd();
- // 这里用s.toString()而不直接用s是因为如果用s,
- // 那么,inputAfterText和s在内存中指向的是同一个地址,s改变了,
- // inputAfterText也就改变了,那么表情过滤就失败了
- inputAfterText= s.toString();
- }
- }
-
- @Override
- public void onTextChanged(CharSequence s, int start, int before, int count) {
- if (!resetText) {
- if (count >= 2) {//表情符号的字符长度最小为2
- CharSequence input = s.subSequence(cursorPos, cursorPos + count);
- if (containsEmoji(input.toString())) {
- resetText = true;
- Toast.makeText(mContext, "暂不支持表情评论哦", Toast.LENGTH_SHORT).show();
- //是表情符号就将文本还原为输入表情符号之前的内容
- setText(inputAfterText);
- CharSequence text = getText();
- if (text instanceof Spannable) {
- Spannable spanText = (Spannable) text;
- Selection.setSelection(spanText, text.length());
- }
- }
- }
- } else {
- resetText = false;
- }
- }
-
- @Override
- public void afterTextChanged(Editable editable) {
-
- }
- });
- }
-
-
- /**
- * 检测是否有emoji表情
- *
- * @param source
- * @return
- */
- public static boolean containsEmoji(String source) {
- int len = source.length();
- for (int i = 0; i < len; i++) {
- char codePoint = source.charAt(i);
- if (!isEmojiCharacter(codePoint)) { //如果不能匹配,则该字符是Emoji表情
- return true;
- }
- }
- return false;
- }
-
- /**
- * 判断是否是Emoji
- *
- * @param codePoint 比较的单个字符
- * @return
- */
- private static boolean isEmojiCharacter(char codePoint) {
- return (codePoint == 0x0) || (codePoint == 0x9) || (codePoint == 0xA) ||
- (codePoint == 0xD) || ((codePoint >= 0x20) && (codePoint <= 0xD7FF)) ||
- ((codePoint >= 0xE000) && (codePoint <= 0xFFFD)) || ((codePoint >= 0x10000)
- && (codePoint <= 0x10FFFF));
- }
- }
然后在activity_main.xml引入该控件就可以了
- <t.s.com.EmoEditText
- android:id="@+id/edtext"
- android:layout_width="match_parent"
- android:layout_height="wrap_content" />
学会了原理就可以根据自己的需求逻辑制作控件了.
文章来源网络:点击这里查看源文.